

When you shoot in the sunlight or anywhere else with bright lights, you’re bound to end up with some harsh shadows every now and then.
But all is not lost.
You can remove shadows in Lightroom with these simple techniques and make it look natural so no one can even tell you edited the image.
Check out the video below for a demonstration.
1. Start With Global Adjustments
This is the simple and often most effective way of getting rid of shadows. In fact, I use these steps on almost every image that I bring into Lightroom.
The first thing I do to remove shadows should not come as a surprise to anyone. Increase the shadows slider to +100. If the shadows are only subtle, then this may be all you need.
The next part is involves two sliders. First, decrease the highlights. It will vary from image to image but -50 is a good place to start.
By decreasing the highlights you’ve reduced the highlights in the entire image, so you will probably have to increase the exposure to compensate.
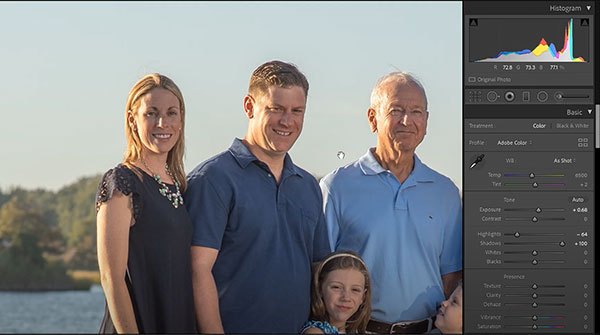
By decreasing highlights and increasing the overall exposure, you’ve effectively brought the brightest parts of the image closer in luminance value to the darker parts of the image.
Unfortunately, there are limitations since the sliders only go so far. For those times when you can’t quite get the result you want with the global adjustments…the next step is to use local adjustments.
2. Use The Brush Tool To Brighten Shadows More
Local adjustments like the brush tool are a great way to layer on additional changes only in the areas where they are needed.
First select the brush tool near the top of the Develop Panel.
Then you want to make sure you have the right settings. Here’s how I set up the brush tool for removing shadows:
- Increase Feather to +100
- Turn on Auto-Mask
- Increase Shadows to +100
- Turn on Overlay (“O” Key) so you can see where you are brushing.

Then you can start brushing only on the shadow areas. In the case of my example here, that would be the darker side of their faces.
Using only the shadow adjustment to start with ensures that you won’t go too far and are only affecting the darker parts of the image.
Turn off the overlay and see how it looks.
If this still has not removed the shadows to the degree you wanted, then you can try increasing the exposure slider. But be careful here. The exposure slider has a strong effect and going too far can make the photo look completely unnatural.
Another alternative you can try before adding exposure is to duplicate the brush effect with only shadows adjusted.
You’ll have to experiment and see what ends up working the best for your particular image.
3. Refining The Local Adjustments
If you had Auto-Mask turned on and were careful when using the brush tool, then you may not need to do this. But often, you’ll find that the brush is affecting areas that are outside of the shadows you are trying to remove.
Here you can switch the brush mode to Erase.
Turn off auto-mask, turn the overlay back on, and then use the feathered edge of the brush to carefully remove the areas you don’t want to be affected. Check out the video above to see how I did this.
4. Balancing Highlight Color Cast
One problem that frequently arises when the shadows you want to remove are created by harsh sunlight is that the bright parts of the image are a different color temperature than the shadows.
So if all you do is brighten up the shadows, then the original highlights will look much warmer in color tone than the areas that you just brightened. This makes it obvious you edited the phone and very unnatural looking.
Luckily, this is often easy to fix.
Select the brush adjustment you just added and use that to increase the color warmth with the Temp slider. Increase towards the warm (yellow) side until the two areas of the photo blend together more naturally.
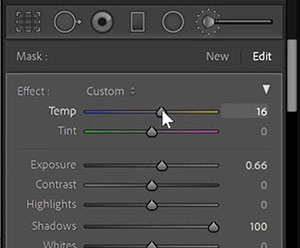
You many not have to do this on every photo, but fixing that color difference between highlights and shadows can make the difference between a success and failure.
5. Masking Out Highlights
The last technique you may find useful is using the Range Mask technique on your brush adjustment.
This allows you to remove the adjustment from the brightest parts of the image based solely on the luminance value of the image.
This can be very helpful if you used the exposure slider in your brush adjustment as it “protects” the highlights by masking out the adjustment from affecting them.