
Zooming in Lightroom is a basic but extremely useful function that will let you see your image up close and more detailed so you can better see how certain changes affect the image.
So knowing all the ways you can zoom in Lightroom and making it second nature will let you edit your photos faster and with more precision.
To zoom in quickly and easily you can just click on the image (press SPACE before clicking if you’re using one of the local adjustment tools). Then use CTRL/CMD and + or – keys to adjust the strength of the zoom.
But there’s a lot more ways to do it and adjust the zoom settings, so let’s dive in…
You can activate the zoom function with a simple click as I mentioned above. But fine-tuning the zoom will let you focus on the areas of the image that you need to work on.
There are three ways you can use and adjust the zoom function in Lightroom.
Keyboard Shortcuts
Like anything in Lightroom, keyboard shortcuts are the fastest way to make things happen. So here are the shortcuts you need to know to be a zoom ninja.
- Quick Zoom (when the magnifying glass is visible) = Click Image
- Quick Zoom (when the magnifying glass is not visible) = Hold SPACE and Click Image
- Zoom In = CTL/CMD and +
- Zoom Out = CTL/CMD and –
- Set Zoom Area = Hold CTL/CMD then click and drag outline around the area you want
- Pan While Zoomed = Hold SPACE then click Image and drag to move
Navigator Panel
The navigator panel in the upper left corner of the Library and Develop modules gives you some extra function to fine tune your zooming.
At the top of the Navigator panel, you can select three preset zoom amounts, two of which can be modified. The options are:
- Fit or Fill
- 100%
- Custom Zoom Amount (12 intervals between 6% and 1600%)
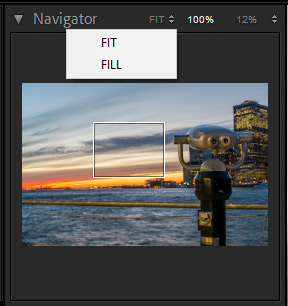
“Fit” will give you the largest size image that still fits within the canvas. This is useful as a shortcut to see the whole image at once after you’ve been working on a zoomed in section of the image.
“Fill” will increase the size of the image so that the entire canvas is covered. This will often result in some of the edges of the image being cut off. This isn’t the most useful so I typically leave this set on “Fit.”
100% will zoom your image in so that you are seeing it at 100% zoomed on your screen. How much this is zoomed in will depend on the size of your image and the resolution of your screen. Each pixel you see on the screen will be one pixel of your image. So a 50-megapixel image will be zoomed in much more at 100% than a 16-megapixel image.
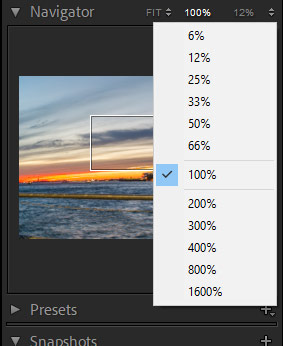
The Custom Zoom option can be set at any of 12 intervals between 6% and 1600%. This can be useful if you have a favorite zoom factor that you like to use. In previous versions of Lightroom this was represented as ratios such as 1:1 , 1:2, 4:1, etc. It was changed recently to simple percentages to be less confusing.
Pro Tip: Zooming out to make the image small on the screen can help you visualize the composition of an image better and see shapes and leading lines without being distracted by the details of the image.
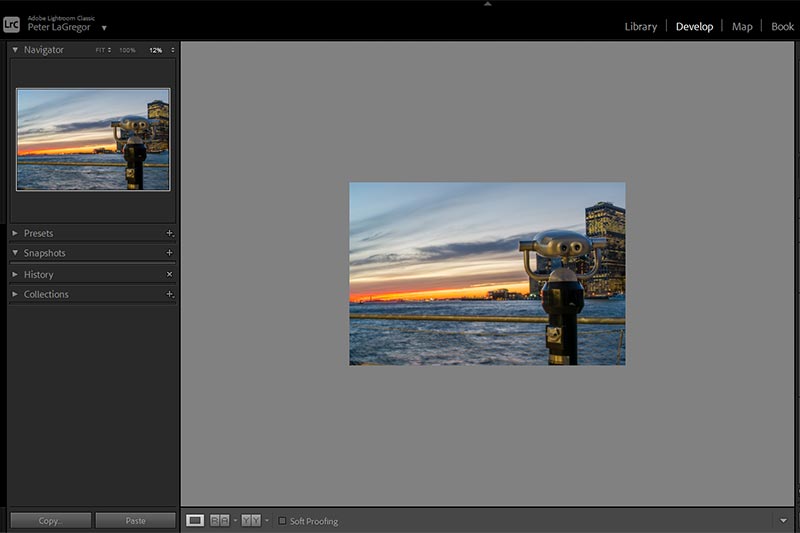
Below the presets is a smaller version of the image. This is useful for seeing where on the image you are when zoomed in. You can also click on the image and drag to move around the image while you are zoomed in.
Zoom Slider On The Toolbar
This is one that I don’t think I ever use. But it’s there and you may like using it, so let’s talk about it.
The Zoom Slider on the toolbar works just like any slider in Lightroom and lets you fine tune the zoom from 6% to 1600%. This is useful if you need finer control over the zoom factor.

I’ve been using lightroom for years now and I don’t think I ever needed that much control over the zoom factor. But it’s nice to know its there if you need it.
Using Zoom For Better Editing
Here are some helpful tips for using the zoom function to help your editing.
Zoom In When Using The Brush Tool
When you need to get more detailed when using the brush tool, you can zoom in as much as you want and then adjust the size of the brush accordingly.
This can help you be more precise when brushing on certain effects.
If you already have the brush tool selected, hold down SPACE and click the image to zoom in.
Don’t Zoom Too Much
Zooming in more than 100% when making slider adjustments to your image isn’t always helpful.
I see this mistake often when using the detail panel for sharpening or noise reduction.
When making these adjustments, you should set the image at 100% and no more. Sharpening when zoomed in more than 100% gives you a distorted perspective on the image and often results in over-sharpening the image.