What Are Light Trails In Photography?
Light trails in photogrpahy are when you use a longer shutter speed to capture moving lights. Because the shutter is opened for a few seconds (or even more) the light creates a trail across the image showing the path that it took.
It is one of the fun and creative ways you can use long exposure photography.
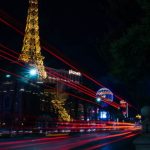
There are a lot of creative ways to use light trails. Cityscapes, landscapes, and even portraits can make great use of light trails to create a sense of energy and motion in the image and add color to an otherwise dreary scene.
Using Light Trails Creatively
Before we get into the details about how to take compelling light trail images, let’s talk about some ways to use light trails creatively to enhance your images.
Show Speed and Create Energy
Light trails create a sense of speed and energy in the image. A viewer inherently knows that the light trail was created by a moving object so they perceive it as action in the image.
You can manipulate this effect and use it to your advantage. For example, the viewer can’t really tell how fast a bus was traveling down the street. As long as it doesn’t stop, you can just lengthen your shutter speed to capture a lot of movement in even a slow moving vehicle.
But in the final image, the car light streaks makes it look as if it were speeding by!
You can use this technique to create energy and excitement in your image even on an otherwise quiet city street. All you need is one or two vehicles going by and it looks like rush hour!
Contrast With A Quiet Landscape
The thing about landscapes is that they don’t move. This is great if you want a quiet peaceful image, but even in the most beautiful settings, this can get old after a while.
But like we just talked about, light trails create energy in the image.
Of course you can’t just add light trails to just any landscape. But you can seek out scenes that use light trails more effectively.
A classic example of this would be the rolling countryside hills with a single road winding through it. During the day this may be a nice scene, but if you go there at night and wait for a car to travel that winding road, you can create a bright leading line that makes the image all the more compelling.
You can also use this in cities to show the path of twisting highway exchanges or even to simplify the composition in an otherwise cluttered or busy city street.
Add Color
If you’re shooting at night then your image will have a lot of dark areas and blue tones. If this is all that’s in the scene, you can end up with a dull image. But add light trails (from a vehicle driving or even a person walking by) and your image instantly has different color tones that create contrast and interest.
Add Special Effects To A Portrait
Most people think landscape or cityscape images when they think about light trails, but you can employ the same techniques in portrait images too. Give your subject a light source. It can be anything from a flashlight to a sparkler. Then have them make designs in the air as you leave the shutter open.
How To Set Up Light Trail Photography
Just like any other image you want to take, planning it out ahead of time can be very important and that is even more important when it comes to shooting light trails. Here are some suggestions for choosing a composition and location…
High Vantage Points
If you are shooting roads and cityscapes, then getting a high vantage point can help you create some spectacular images.
Getting up high can let you see more of the roads and even begin to see shapes and patterns in the roadways. This lets you use those paths to you advantage when composing your image.
You can often accomplish this by finding a nearby building to shoot from (just make sure you have permission to be there) or take the easy route and pick up a drone like this one that does an amazing job and can actually stabilize itself in the air long enough to shoot a light trail image.

Curves
Straight light trails are good, but winding curves in the image are often more dynamic and can lead the viewer through the image.
But remember not to just shoot curvy light trails for the sake of shooting curves. Do so with purpose and attention to where the curves are leading. You want to keep the viewers eyes in the image and pointing to a focal point.
Don’t just let the light trails fly off the side of the image. A good approach is to compose your image so that they lead off to the horizon rather than out of the frame.
Light Trail Photography Camera Settings
Of course every scene will require different camera settings, but here are some things to keep in mind when you are setting up your camera.
When it comes to light trails, you’re going to need some practice. Start by just going out to a local road that is busy and finding a safe spot to shoot from at dusk. That will help you get a feel for what works and what doesn’t. Then when you find yourself in an ideal situation for shooting light trails, you’ll be ready.
Shutter Speed
This is the part that most people get wrong. There is no “correct” shutter speed for light trails.
You need to figure out where you want the light trail to start and stop and then estimate how long it will take the moving object (car, person, llama with a head lamp, etc.) to get from point A to point B. That will be your shutter speed. Set that first.
Then you need to determine whether that shutter speed creates a good exposure. From there you can use your aperture and ISO settings to dial in your exposure while leaving the shutter speed alone.
Try to avoid going with too high of an ISO as that will degrade the quality of your image. “Too high” is different on every camera when it comes to ISO. Try taking images at home at different ISO values and see where you think the image starts to degrade to a point that makes you unhappy with it.
Also be careful with your aperture. Too wide of an aperture and you may end up with a lot of the scene out of focus. This can be especially problematic if you are shooting light trails in a scene with objects in the near foreground that you want in focus.
Sometimes, even when shooting at night, the shutter speed you need will result in an over exposed image and ISO and aperture aren’t enough to get that under control. In that case, you need an ND filter to cut out some of the light hitting your sensor. I use these filters for all my work.

Manual Focus
Using manual focus is almost essential with light trail photography.
Because you’re shooting in low light, the camera may try hunting for focus every time you hit the shutter button, delaying the release and causing you to miss the timing. Even if you time it right, you can’t guarantee the camera get’s it right.
Instead, get your focus set ahead of time. You can use auto focus for this if you want. You can also use the LCD screen and zoom in real close to use manual focus to be extremely accurate (my favorite method).
Once you get the focus you want, switch it to manual focus and don’t touch the focus ring on the lens. You’re all set and not you don’t have to worry about timing the focus or getting it wrong.
You may also want to learn about using back button focus. I tried it years ago and never switched back.
Take Multiple Images

Ever nail the perfect image on the first shot?
Yeah, me either.
But with light trails, taking multiple images is about more than just getting a good one. You can actually use multiple images to create one that is better than all of them.
You can accomplish this through exposure stacking in
This can be a helpful tenchnique when you can’t shoot a long enough shutter speed and still get a good exposure.
What Gear Do You Need For Light Trail Photography?
Camera
This should go without saying (but if I leave it out someome will let me know!). Light trail photography usually requires low light shooting. But it also requires longer shutter speeds so you don’t necessarily have to have a camera that does well in low light…though it sometimes helps to being out a little more detail in the shadow areas.
Ultimately, as long as your camera has manual settings, then you can use it for light trail photography.
Tripod
A tripod is a necessity for any type of photography with longer shutter speeds, and that includes shooting light trails. You’ll need to stabilize your camera so that the long exposure doesn’t create blur in the image.
If you listened to my advice above and want to shoot multiple images, then
(Optional) Remote Release
A remote release can be helpful when shooting with longer shutter speeds. They let you lock the camera down on a tripod and not have to touch it to trigger the shutter.
If you don’t have one, try using your camera with a short delay (1-2 seconds) so that any vibrations from you hitting the button will have dissipated by the time the shutter is released. The delayed shutter method makes it harder to time, but can be handy if you don’t have a remote trigger.
Common Mistakes When Shooting Light Trails
Here are some of the more common mistakes I’ve seen photographers make when attempting to shoot light trail photography.
Not Enough Contrast
The light trails should stand out in your image. So you need some kind of contrast between them and the rest of the scene. This can be luminosity (brightness) contrast or even color contrast (or a combination of both).
But just don’t let the light trails blend into the rest of your image, then you lose most of the creative benefits of shooting light trails.
Bad Exposure
Don’t forget to get a correct exposure on the whole image. You can have the coolest light trails ever, but if the rest of the scene is overly dark and has no detail, then the image more often than not will fall short.
You can avoid this by shooting shortly after sunset rather than later in the night when it gets darker. This is often called “blue hour.” There is still a bit of ambient light in the sky so it is easier to balance the exposure with the brighter light trails.
Light Trails That Are Too Short
You need to carefully plan out the length of your light trails. If they abruptly end in the middle of the frame then the photo will look incomplete. There are always exceptions and you may want to do that for artistic reasons, but most of the time (especially when you’re just getting started), longer light trails generally look more appealing.
Awkward Direction
The direction of the light trails are an important component of your composition. Give some thought as to how the trail will flow through the frame and what you are leading the viewer to focus on.