Dodging and Burning is a phrase that comes from the darkroom days when photographers would either block the light or add more in specific areas during the print making process to darken or lighten areas of the image.
The good news is that dodging and burning in
A lot of photographers will go right to
So let’s go over 3 steps to take for effective dodging and burning your images in
So to show you the process I’ll use the photo below. I reduced the contrast in the image to more accurately represent how a RAW image right out of your camera would look. It’s a well-shot photo but some strategic dodging and burning can help add some dimension and punch to the image.

1. Plan Your Photo
This is the part that most photographers (even pros) forget about.
I’ve even seen video tutorials that are supposed to be teaching you how to edit a photo and its a meandering mess without any direction.
Sure, there are times when you want to experiment and try different techniques to see what works, but if every editing session is like that then you’ll never finish and you’ll probably end up hating photo editing.
So have a plan!
The image below is a visual representation of how you should be looking at an image ahead of time. You don’t have to make a diagram of every image, but you do need to give it some thought. If you looked in the darkroom of some of the great film photographers, you would see a lot of prints with notes on it like this.

Once you read this guide, you should have an idea what to look for. When I am planning…I like to start off by deciding what is important in the image and what isn’t, then move on to identifying details to dodge and burn. But when I do the actual editing itself…I work the other way.
2. Dodge and Burn The Details First
Have you ever looked at a professionally edited photo and wondered how that got that “pro” look?
Most of the time the answer is simple dodging and burning of the details in the image.
How To Bring Out The Detail
That means getting in there and slightly darkening shadows and lightening highlights.
Keep in mind, this isn’t about changing the image or correcting it. This is about enhancing what contrast is already there. By enhancing the contrast with a more targeted approach, your image comes to life with more depth and interest than it had before.
Using The Brush Tool
The best tool for dodging and burning in
The reason it is so useful is that you can adjust the effect after you apply it to the image.

I start with a brush set at -1 exposure for darkening (burning) and +1 exposure for brightening (dodging). That is often a little too much but it will let you see where the effect is being applied more easily. You can pull it back afterwards.
The size of the brush will depend on what part of the image you are working on.
The “Feather” setting will make sure the edges of the brush are soft (or blurred) so that whatever effect you paint on is more natural. I typically use a 75 for this.
The “Flow” setting allows you to control how much of the effect is being painted onto the image. This is a little different than changing the adjustment after the fact. It can be helpful to think of flow as how much you are covering the image with the adjustment. This will allow you to apply more in one area than the other while keeping the adjustment setting the same. I typically use 25 for this and then just go over areas more than once if they need more coverage.
The “Density” setting is a maximum of how much of the effect can be painted on without lifting the brush up (un-clicking and clicking the mouse button again OR lifting up a tablet pen). I prefer to keep this relatively high (between 70 and 100) and use flow to control how much is being painted on. But it can be helpful sometimes if you want to make sure to avoid adding too much.
Brush presets
A great way to accomplish this is with brush
Dodging and Burning Faces
This is where you will need some practice to get good.
But if you’re like me and have no clue how women’s makeup is typically used, then you’ll need to learn a few things.
First, look at how the light is hitting the face. If your subject is lit well, then you want to accentuate that light, not fight against it.
Next, you can add contour to the face.
Using this technique is very similar to applying makeup. If you are skilled in that, then you already know how to dodge and burn a woman’s face.
In general, you will look to brighten the forehead, the eyes and around the eyes, the bridge of the nose, and the chin.
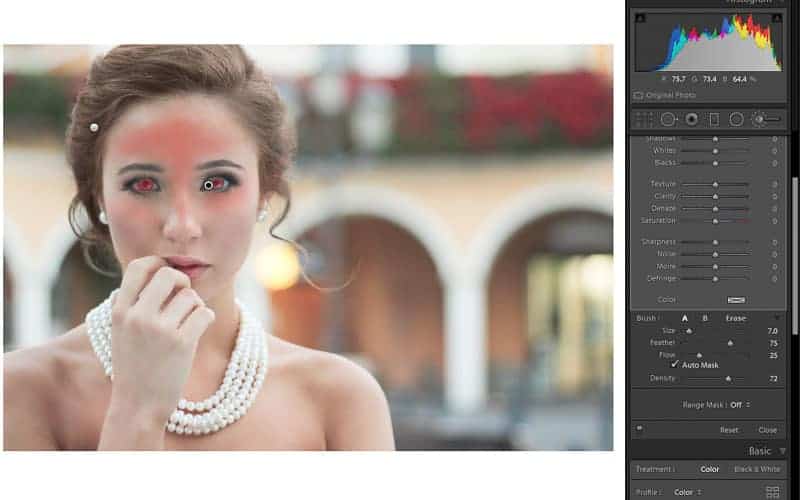
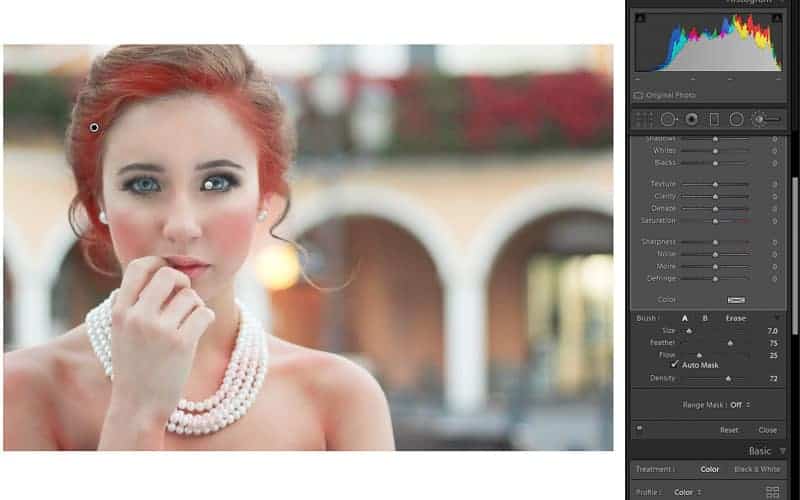
One thing to look out for when dodging the eyes is losing contrast. You may need to use a new brush for just the eyes and add some contrast back into the image as well as sharpness just on the eyes.
You also will want to darken the cheekbones as well as the jawline and the hairline to frame the face. This will add definition to the structure of the face. Darkening the jawline can also help to take attention away from a double chin.
Also, when someone has longer hair, I like to darken the shadows and brighten the highlights in the hair separately to give it more depth.
How aggressive you get with this is a matter of style and taste.
The best way to learn this is to look at a lot of professionally retouched portraits online and in magazines to see what you like.
Next Step…
Once you have taken care of the detailed dodging and burning, your image should be starting to have a really three dimensional quality to it. If you’ve never done this before, you might be pretty excited at how much better the image looks now.
The next step is to use larger scale dodging and burning to guide the viewer’s eye to the focal point or points of the image.
3. Guiding The Viewer With Dodge and Burning
In the darkroom days, photographers would make a test print and use a crayon or marker on the image to map out what was important and what needed to fade into the shadows.
You should take a similar approach with your images at this stage of dodging and burning.
Start by working on the biggest sections that you want to darken first using the tools listed below. Then work your way to the smaller portions.
Then if necessary, use some these same tools to add a little bit of brightness to any areas you want to bring out, such as the face of your subject. But go easy on the dodging (brightening) here.
If you’ve edited the image properly to start then you already have the brightness of the face where you want it. So it often better to just subtract brightness where you want to reduce attention and leave the important areas alone.
Graduated Filter
I like to start with a graduated filter, especially if there are big chunks of a portrait that need to be darkened (burned).
Some examples can be a wide angle portrait with a lot of trees of foliage on either side. In that case, just bring in a graduated filter on both sides and lower the exposure. You can play with the angle and the softness of the gradation from dark to light until it looks good.
Sometimes, I may want a vignette effect but the image doesn’t lend itself well to a circle or elliptical vignette. In that case, I’ll use four graduated filters coming in from each of the corners of the image.


Post Crop Vignette
This is the easy route.
If it works for your image…awesome! You just saved some time.
If your subject is in the middle of the cropped image or if you just want to add a little extra burning to the four corners of the frame evenly, then the post crop vignette is the way to go.
What I like about this is that even if you go back and change the crop of your image, the vignette will remain even based on the new crop (…that’s why they call it “post crop” vignette).
I tend to use this as the last edit on an image when I want to add just a little extra burning to the corners.
If your subject is anywhere but the very middle of the image, then this next tool is a great alternative to the vignette…
Radial Filter
The radial filter can be used in a very similar manner to the vignette tool, except that you have much more control over the results.
In an image like the one we have here, the subject is not in the center, so using the vignette tool would not really work.
Brush Tool Again
Finally, grab that brush tool one more time.
Here you want to take a look at your image as a whole and hit those distracting bright spots that may have escaped your efforts so far. Hit them with some targeted burn action and you’ll have finished minimizing attention to the unimportant areas of the photo.

And here is the result. I pushed it a little farther than I normally would so that you can see the differences more easily on the web.
If you go through this process for each portrait you’ll get better at this very quickly and your portraits will start to look a lot better.
How Far Do You Take It?
As a final check, I like to move the overall exposure up and down a little just to get a little different perspective on the image.
Another good check is to view the image in black and white. That lets you focus solely on the luminosity rather than certain colors that may be distracting.
Make sure that you haven’t made any parts of the image so dark that they lose all detail or look weird.
